Installing WordPress on IIS using the Web Platform Installer
Introduction
In the following walkthrough we will step through the installation of WordPress using the Web Platform Installer (WebPi).
Installation
1. Launch the Web Platform Installer either from IIS Manager or Start > All Programs > Microsoft Web Platform Installer.
2. Click the Web Applications tab and the select WordPress. Click Install.
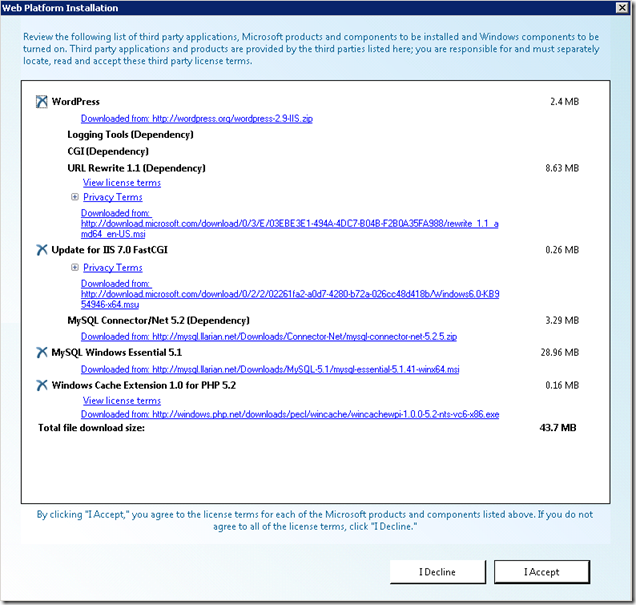
3. On the next screen you will be prompted to accept the license for the products you wish to install. This includes your WordPress selection along with associated dependencies. Optional items such as “Windows Cache Extensions 1.0 for PHP 5.2” can be removed by clicking the X icon next to the product name. For this example I will leave all of the items in place. Click I Accept to continue.
4. On the next dialog you will be prompted to provide a password for the MySQL administrator account “Root” . Enter a password of your choice and click Continue. This will be needed later when you install the database for Wordpress.
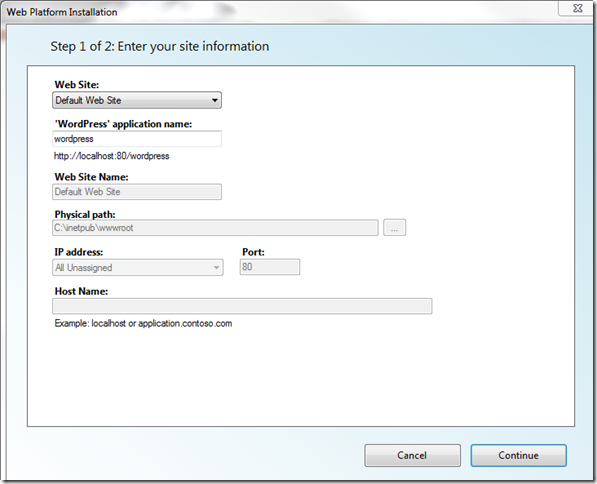
5. The next screen “Enter your site information” is where you will enter information about how you want to set up WordPress in IIS.
In the first option Web Site: you can choose any existing website such as “Default Web Site” or New Web Site.Depending on which option is chosen the following options will be available.
Choose an existing Website
- Wordpress application name: This can be left at the default “wordpress” or enter a new name.
New Web Site
- Wordpress application name: Default “/” : The slash indicates the root of the website you are about to create.This can be left at default here since the application is already isolated by a different website.
- Web Site Name: Accept the Default “wordpress” or enter a new name .
- Physical Path : Defines the physicalPath of the web site in IIS and will be where the WordPress application files are installed.
- IP Address: Choose an IP address from the list or leave at all unassigned if you are going to use a unique port or Host name for the site..
- Port: Default 80. Leave at default or changed to desired port.
- Host Name : Enter a host name if you are differentiating by host headers.
For the purposes of this example I am choosing the “Default Web Site” and leaving the applicaiton name as “wordpress”. Click Continue
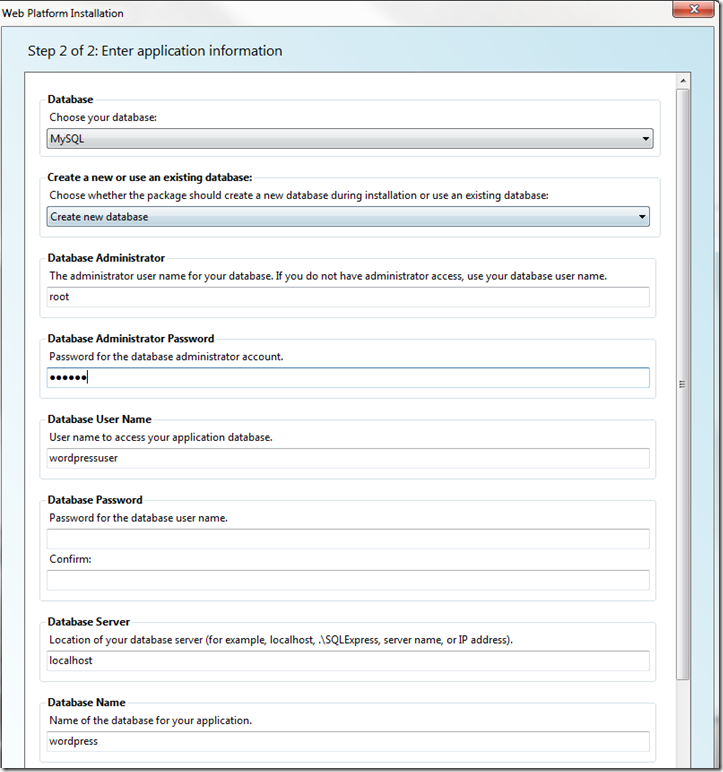
6. On the Enter Application information screen you will enter application information for Wordpress including Database information and application passwords .
Since this is a large dialog I have broken the screen shot in 2 pieces . Hopefully this makes it easier to follow.
- Database : Choose your database : This cannot be changed and is set to MYSQL.
- Create New database /Use an Existing database: If installing Wordpress for the first time you will leave this at Create New Database. If using an existing database you will need to provide the Database User name and password that was created during a previous installation.
- Database Administrator : This defaults to “root” which the default Administrator account for MySQL which we configured earlier.
- Database Administrator Password: Password for the account configured in the previous field. In a default setup this will be the password for the account “root”.
- Database User Name : Default “wordpressuser” This can be configured to any name you wish.
- Database Password + Confirm: This is the password you will create for the account named in the previous field.
- Database Server : Use Localhost for local MySQL installations.
- Database Name : Default wordpress . This is the database name that will be added to your MySQL instance, you can accept the default or enter a new name.
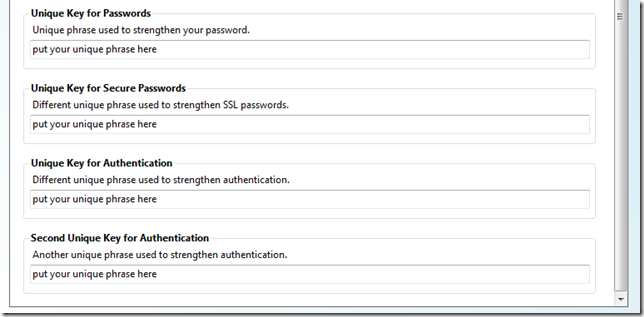
7. Unique Key Section of Dialog
The keys are used to strengthen each of the elements and are not something you need to remember. A reference to these settings can be found on the WordPress site under the Security section, See Security Keys .
The mappings to the Field name in the installer are as follows.
- Unique Key for Passwords :AUTH_KEY
- Unique Key for Secure Passwords: SECURE_AUTH_KEY&
- Unique Key for Authentication : LOGGED_IN_KEY
- Second Unique Key for Authentication : NONCE_KEY
To populate these I used the online Generator from Wordpress that will create 4 unique keys that can be used here. Note that if you use this just copy the Key value between the single quotes and shown in red below.
define('AUTH_KEY', 'fZIgr9W-p3eE&]Qdmb@N8 HW%6bfPW!a1aT{C%fAKeH+;_@K=4:}ip1Q[V+tD)+P');
Once this is completed click Continue.
8. When the installation is complete the following will be presented . Click on Launch WordPress to test the installation.
The URL this will use based on the settings above will be Http://localhost/wordpress/
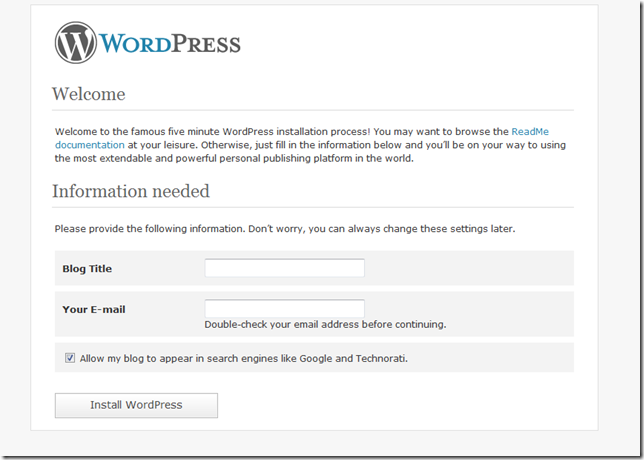
9. If you see this the WordPress is up and running. For usage of WordPress I recommend visiting the Wordpress.org site .
Known Issues
MY SQL Connector/Net version conflicts
Currently we install MySQL Connector/Net version 5.2. If there is a later version the installation will fail with the following error.
Error
'MySQL Connector/Net 5.2' is Failure (Another version of this product is already installed. Installation of this version cannot continue. To configure or remove the existing version of this product, use Add/Remove Programs on the Control Panel.)
Resolution
Side by Side installations of the connections are not supported. To resolve this issue the Later version is the only workaround if using Web Platform Installer to install Wordpress. Alternatively you could install WordPress manually.
Url Rewrite Version conflicts
If UrlRewrite V2.0 is installed the installation will fail with the following error.
Error
'URL Rewrite 1.1' is Failure (A newer version of Microsoft URL Rewrite Module 1.1 for IIS 7 was found on this machine.)
Resolution
Uninstall UrlRewrite 2.0 and Reinstall WordPress.

