How To: Configure MySql to work with IIS DB Manager
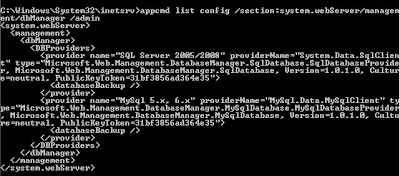
Let's start: The first thing we need is IIS DB Manager it self. Information and download location on DB Manager can be obtained from the IIS Extensions site. Once you have downloaded the installation package and installed DB Manager you should be seeing an entry as follows in administration.config.

Note: The above command in the image will only work if you are using IIS 7.5 (ie. you run that command on Windows 7 or Windows Server 2008 R2)Now, it's time to get it working with MySql. I have a free edition of MySql installed on my local Windows 7 machine so that's what I will be working with. If you don't have MySql you can get it from here. Once that's installed and ready to run try making a few Databases to play around with.
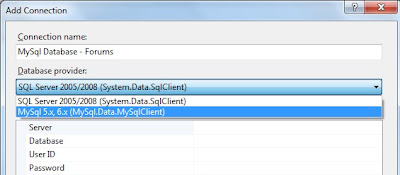
We now have IIS and MySql setup properly to get the whole thing working. Lets open up IIS manager drill down to Default Website. Now double click Database manager. Create a new connection. Give it a new name and click on the drop down for database provider so that we can select "MySql 5.x, 6.x". But hey hold on ... do you see that option?? NO! ... :-) now that's fun aint it??
You have IIS DB Manager configured properly, MySql working properly but you JUST cant see the provider even though it's present in the administration.config file. That was exactly what I missed.
If we check the image above carefully it states MySql provider name to be MySql.Data.MySqlClient ... Now open up your 2.0 machine.config located at %windir%\Microsoft.NET\Framework\v2.0.50727\CONFIG and find MySql.Data.MySqlClient. You are not going to find it. Aha! Now it makes you think what is MySql.Data.MySqlClient after all? Well MySql.Data.MySqlClient is an all-managed .NET driver for MySQL DB from MySql team. Bingo! suddenly everything makes sense. We had the parts but just missed the connector to tie it all up. The latest available version of the connector can be downloaded from the MySql Site for free. It's a pretty simple setup, however you would be requiring Admin privileges to complete the installation.
Once the installation is completed open up machine.config and search the entry. This time you will find it and BANG we are good to go. Now open up your IIS manager, drill down to the default website and double click Database Manager. Now create a new connection. Creating a new connection to MySql is very simple and straight forward. You will be seeing a screen as shown below:

As you can see now we select the Database provider to be "MySql 5.x, 6.x". The rest of the entries as just as simple as the other.
Server: Put down your servername. In my case it was localhost.
Database: Give your database name
User ID: For default installation of MySql it will be root. If that is not the case then put down the User name given to your by your DB Administrator.
Password: Provide the appropriate password for the user id.
Port: The default port used by MySql is 3306.
Click on Ok once all the details are entered and you are now good to go with the IIS DB Manger and MySql. Time to play around! Have Fun!
If you have any problems check this topic at iis.net forums. If the topic doesn't solve your problem then post the issue at the DB Manager forum at iis.net