Extending the TreeView in IIS 7 in Windows Vista

Extending the Hierarchy Tree View in InetMgr

InetMgr exposes several extensibility points that developers can use to plug-in their own features and make them look and feel just as the built-in functionality. One of those extensibility features is the hierarchy tree view and is exposed mainly through three classes:

  1. HierarchyService. This class is the class that handles the entire hierarchy and an instance is provided by the UI and you can get a reference to it through a ServiceProvider. It is used to manipulate the tree view programmatically, exposing methods to perform actions such as Select, Delete, Refresh, etc.
  2. HierarchyInfo. This abstract class represents a node in the tree view, for example the Web Sites node, the Default Web Site's node, the connections node are examples of instances of HierarchyInfo’s. This class has properties like Text, Image and allows you to react to actions such as selection, deletion, etc. Developers extending the tree view will need to create their own derived classes to implement the behavior as explained below.
  3. c) HierarchyProvider. This abstract class is the base class for all the features that want to extend the tree view. HierarchyService will query each of the registered providers to create the treeview. Developers that wish to add their own nodes should register a HierarchyProvider through the IExtensibilityManager interface.

To extend the Tree view to add your own set of nodes or context menu tasks, developers need to perform the following actions:

  1. Create a class that derives from HierarchyProvider and handles the GetChildren and/or GetTaskItems to provide any nodes or tasks as needed.
  2. Register the HierarchyProvider using the IExtensibilityManager, this is typically done during the Module initialization phase.
  3. 3) Handle navigation and syncronization as needed.

Tasks illustrated in this walkthrough include:

  • Creating a HierarchyProvider and creating HierarchyInfo classes
  • Registering a HierarchyProvider
  • Testing the new feature
Note:
This walkthrough is a continuation from the previous three walkthroughs you can find on how to extend InetMgr.
You can find the first three at:

Task 1: Creating a HierarchyProvider

HierarchyProvider is the base class that developers need to inherit from in order to get calls from the UI whenever a node needs to be loaded. This way they can choose to add nodes or tasks to the HierarchyInfo node that is passed as an argument.

To create a HierarchyProvider
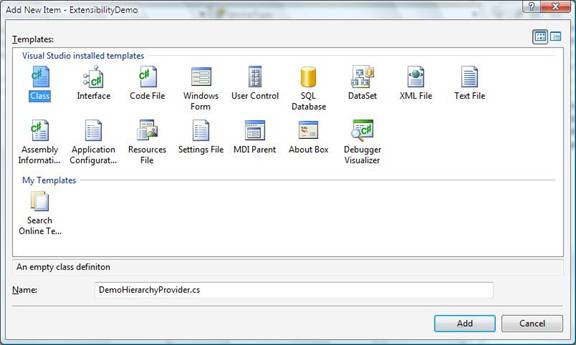
  1. Back in Microsoft Visual Studio 2005 in the ExtensibilityDemo solution, select the option Add New Item from the Project Menu. In the Add New Item dialog select the Class template and type DemoHierarchyProvider.cs as the name for the file.
  2. Change the code so that it looks as follows:
    using System;
    using 
    Microsoft.Web.Management.Client;

    namespace 
    ExtensibilityDemo {

        
    internal class DemoHierarchyProvider : HierarchyProvider {

            
    public DemoHierarchyProvider(IServiceProvider serviceProvider)
                : 
    base(serviceProvider) {
            }

            
    public override HierarchyInfo[] GetChildren(HierarchyInfo item) {
                
    if (item.NodeType == HierarchyInfo.ServerConnection) {
                    
    return new HierarchyInfo[] { new DemoHierarchyInfo(this) };
                
    }

                
    return null;
            
    }


    internal class DemoHierarchyInfo : HierarchyInfo {

                
    public DemoHierarchyInfo(IServiceProvider serviceProvider)
                    : 
    base(serviceProvider) {
                }

                
    public override string NodeType {
                    
    get {
                        
    return "DemoHierarchyInfo";
                    
    }
                }

                
    public override bool SupportsChildren {
                    
    get {
                        
    return false;
                    
    }
                }

                
    public override string Text {
                    
    get {
                        
    return "Demo Page";
                    
    }
                }

                
    protected override bool OnSelected() {
                    
    return Navigate(typeof(DemoPage));
                
    }
            }
        }
    }

The code above creates a class derived from HierarchyProvider that implements the base GetChildren method verifying that the node that is being expanded is a ServerConnection; if that is the case it returns an instance of a DemoHierarchyInfo node that will be added to that connection. The class DemoHierarchyInfo simply specifies its NodeType (a non-localized string that identifies the type of this node), SupportsChildren (false so that the + sign is not offered in tree view) and Text (the localized text that will be displayed in the tree view). Finally it overrides the OnSelected method and performs navigation to the DemoPage as needed.

Task 2: Registering the HierarchyProvider

In this task we will register the hierarchy provider created in the previous task so that the HierarchyService starts calling this type to extend the tree view.

To register the provider
  1. Back in Microsoft Visual Studio 2005, open the file DemoModule.cs, and add the following code at the end of the method to register the provider:
    IExtensibilityManager extensibilityManager =
        
    (IExtensibilityManager)GetService(typeof(IExtensibilityManager));

    extensibilityManager.RegisterExtension(
        
    typeof(HierarchyProvider),
        
    new DemoHierarchyProvider(serviceProvider));
  2. The entire code should look as follows:
    protected override void Initialize(IServiceProvider serviceProvider,
                                       ModuleInfo moduleInfo) {
        
    base.Initialize(serviceProvider, moduleInfo);

        
    IControlPanel controlPanel =
            
    (IControlPanel)GetService(typeof(IControlPanel));

        
    ModulePageInfo modulePageInfo =
         new 
    ModulePageInfo(thistypeof(DemoPage), "Demo""Demo Page");

        
    controlPanel.RegisterPage(modulePageInfo);

        
    IExtensibilityManager extensibilityManager =
            
    (IExtensibilityManager)GetService(typeof(IExtensibilityManager));

        
    extensibilityManager.RegisterExtension(
            
    typeof(HierarchyProvider),
            
    new DemoHierarchyProvider(serviceProvider));
    }

Task 3: Testing the new feature

To test the feature

  1. Compile everything using Build Solution from the Build Menu and run InetMgr.exe from the <Windows>\System32\InetSrv directory.
  2. Connect to localhost using the TreeView and expand the server connection node.
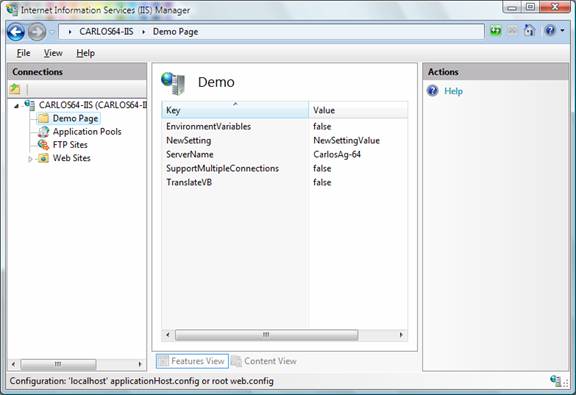
  3. This will show the new node underneath the connection. When you click on it, it will navigate to the demo page just as expected:


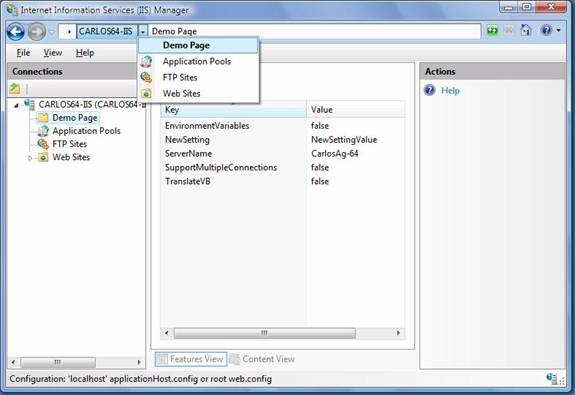
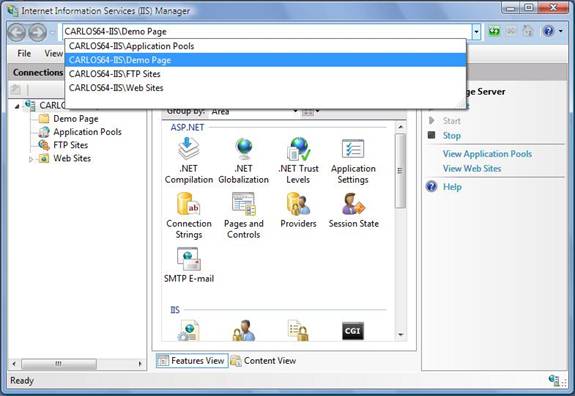
  4. Furthermore, the breadcrumb at the top of the UI will automatically discover it and you will be able to navigate to the page by clicking on it, as well as using the text editing and intellisense feature it provides.


Next Steps

In this lab, you learned how to extend the tree view to customize any node on it and add your own nodes to it. You can also override the GetTasks method to provide context menu tasks for existing nodes, and you can also override the SyncSelection method to customize the way synchronization of navigation works.
No Comments